ActiveTrail for Salesforce Setup Guide
If you’re here, that means you’re ready to reap the benefits of twice the data and twice the advantages made possible through the auspicious exceptional integration between ActiveTrail and Salesforce. In the guide that follows we describe how to connect the two platforms in order to synchronize your lead and customer lists, their areas of interest, ages, genders, or any other information you might want to extract from Salesforce into ActiveTrail. This will allow you to see the whole picture for each and every one of your customers, to know which content piques their interest, which products they use most often, the nature of their activities, and how to fine-tune your messages to their needs and wants.
Some important information before we get started:
A moment before we plunge into the details, here are a few things you should verify to ensure that the integration goes through as smoothly as possible
- Make sure that your ActiveTrail account is an Admin account.
- Make sure that your Salesforce account is an Admin account with “Lightning” activated. In addition, the Salesforce user needs to be a “Marketing User” in order to add leads and contacts to Salesforce campaigns.
- Please note that the display on your device might appear different than the screenshots presented on this page.
- Please be aware that the integration allows you to connect a single ActiveTrail account to a single Salesforce account.
- To ensure successful completion of the integration, we recommend avoiding halting the installation in the middle and to finish the process in a single, continuous session.
Are you ready? Let’s get started!
Install the ActiveTrail application in your Salesforce account
To install ActiveTrail in your Salesforce account, follow these steps:
- Login to your Salesforce account and add the following line to the end of the URL: packaging/installPackage.apexp?p0=04t3X000003DxYt
For example: https://login.salesforce.com/packaging/installPackage.apexp?p0=04t3X000003DxYt
- In the installation window, choose the users for which you would like to install the add-on (admins only / all users / a specific user).
- Mark the checkbox to authorize installation of a non-Salesforce add-on and click on the “Install” button.
Attention: this link refers to version 14 of the add-on.

- Allow third-party access by checking off the check box and click “Continue”.

- Click on “Done” to complete the process.
Obtaining a connection key in order to activate the device
- In a new window connect to your account on the ActiveTrail website.
- Go to the “Integrations” tab and select the API > API Keys menu.

- Click on the “New” button.
- In the API app window, name the key in the “Name” field.
- Click on “Save”.
- In the “Access token” window click on the “Copy to clipboard” button and paste the key in a safe place (e.g. Notepad). You will need it when activating the add-on in Salesforce.
- Click on “Close”.
Activating the ActiveTrail add-on in Salesforce
- Go back to the Salesforce window, open the “App Launcher” menu and select the “ActiveTrail App” option.
- Go to the “Settings” tab.
- Paste the key you were issued in the previous phase in the “valid connection token”
- Click on the “Connect to ActiveTrail” button.
Displaying and updating fields in Salesforce
By default, all fields are hidden in Salesforce, allowing you to choose to display only the most relevant fields through the Details tab. You can display lead, contact, campaign and object fields.
- Go to the “Leads” tab.
- On the SETUP tab, click on the “Edit object”
- Click on the “Page Layouts” link and then on the “Lead Layout” link.
- Select the “Fields” panel from the list and, with your mouse, drag the required fields and checkboxes from the panel to the Lead Details panel (ActiveTrail Statistics, Lead Status, etc.).
- Click on “Save”.
Attention: The same method applies to adding required fields in the “Contact” and “Campaign” Layouts.

Adding a “Assign to Campaign” button to a Salesforce Layout.
Now, after you’ve selected the fields and layouts you need in Salesforce, the time has come to beef-up the brains with ActiveTrail muscle:
- Go to the “Leads” tab.
- On the SETUP tab, click on the “Edit object” button.
- Click on the “Page Layouts” link and then on the “Lead Layout” link.
- Select the “Mobile & Lightning Actions” panel and drag the “Assign to Campaign” button on to the “Salesforce Mobile and Lightning Experience Actions” panel.
- Click on “Save”.

Synchronize between ActiveTrail and Salesforce
In order for the synchronization between the ActiveTrail site and the add-on to work, the ‘Sync Interval” field needs to be defined and the “Sync” button needs to be in the Enabled state. You will need to choose the time period between synchronizations, such that the synchronization will take place automatically and the new updates will be entered directly into the systems. Contact field information synchronization occurs immediately (the sync pertains to the contact’s status). As such, you need not worry about setting a small interval between synchronizations and can even choose a 24 hour interval. The Lead and Contact “Subscriber Status” fields will update accordingly. The “Last Sync Date” field will display the date and time of the last synchronization. Here’s how to do all this in an orderly fashion:
- Go to the “Settings” tab.
- Scroll down.
- Set the number of minutes between synchronizations (“Sync interval minutes”).
- Change the status of the “Sync” button to Enabled.
- Click on the “Confirm”
- Click on “Save”.

Attention: The time period between synchronizations cannot be less that 10 minutes, otherwise an error message will be displayed, and the synchronization settings won’t be saved.
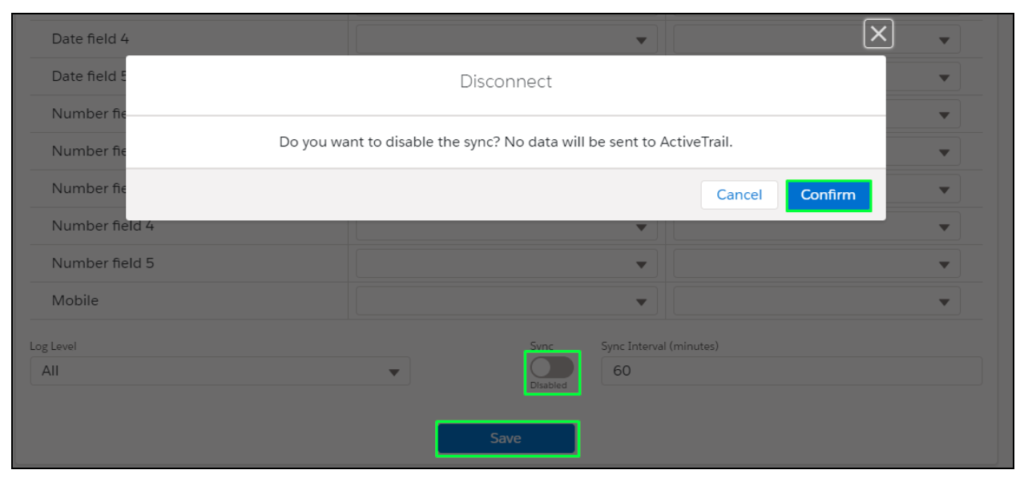
Would you like to turn off the synchronization? You will need to take the following actions to change the status of the “Sync” button to its Disabled state:
- Go to the “Settings” tab.
- Scroll down.
- Change the status of the “Sync” button to Disabled.
- Click on the “Confirm”
- Click on “Save”.

Level of detail recorded in the log file.
You may select the granularity of the events recorded in the log file – beginning with nothing being recorded, through to recording only failures and on to having all events written to the log file. To define the level of detail of the recorded data, follow these steps:
- Go to the Settings
- Scroll down.
- Select the level of detail from the Log Level dropdown menu.
- All – All event types will be recorded in the log: errors and API requests.
- Errors Only – Only errors will be written to the log.
- Nothing – Nothing will be recorded in the log.
- Click on “Save”.

Congratulations! You just finished connecting between the applications and are ready to enjoy all of the benefits of ActiveTrail for Salesforce.
What’s next?
ActiveTrail for Salesforce: The Next Steps
ActiveTrail for Salesforce: FAQ’s

